Tuesday, May 31, 2011

The Great Pillow Upcycle

I don't know about you, but when I buy new pillows I never seem to throw away the old ones. My excuses range from claiming they are guest pillows to worrying we'll hate the new pillows and want our old ones back.  So, when we cleaned out of storage closet a few weeks ago, we found four pillows in there that were not being used! Yikes! I knew that I needed to get rid of those pointless, hoarded pillows but I couldn't bring myself to throw them away....so I do what I always do in this situation.  I upcycled them!

Via

With camping season upon us, John and I are realizing we are getting older. No longer can we sleep on the ground with rocks and sticks poking us all night long without waking up too sore to move.  No longer can we simply roll up a sweatshirt and use it as a makeshift pillow without tossing and turning all night long unable to get comfortable.  We've turned into the luxury-craving campers that need pillows and an air mattress and other things we swore we'd never succumb to.


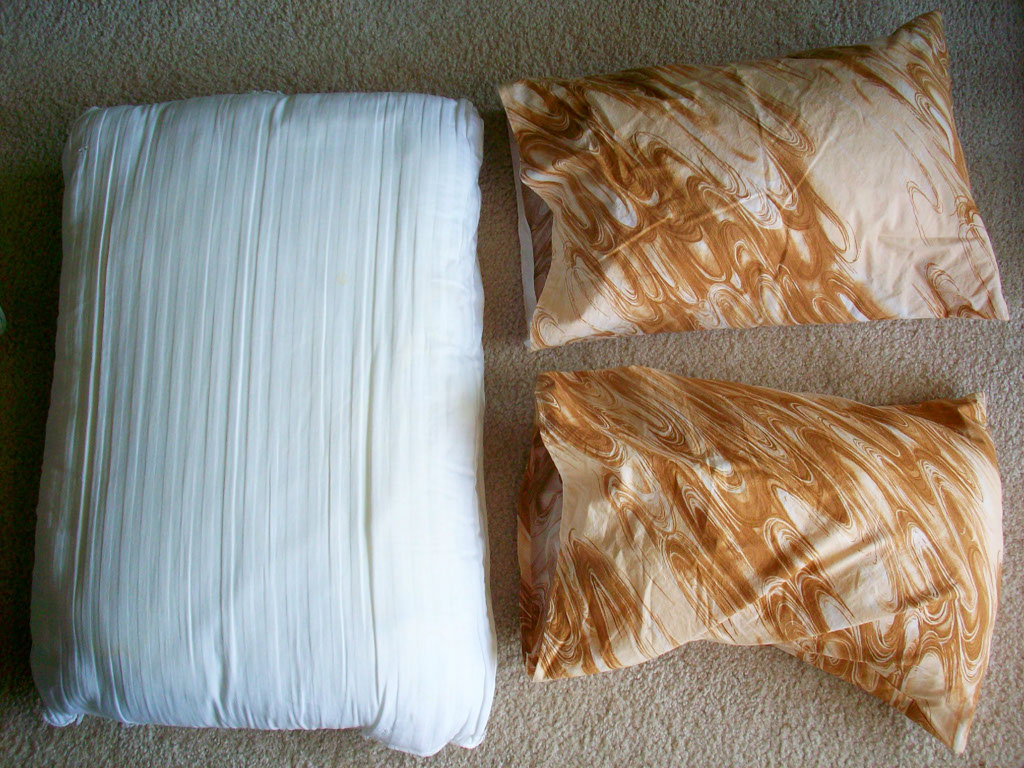
Enter the first pillow upcycle project.  I hated toting two full-sized pillows with us camping. Not only do they take up too much room, but they also announce to the world that we aren't rough and tough campers anymore. After seeing some small camping pillows at a sporting goods store (for $20 each, no less), I decided to make our own camping pillows.

After ripping out the seams of the pillow, I washed the fabric in bleach and cut it in half while the stuffing was sitting in the sun.  Using my awesome new sewing machine, I was able to quickly sew 3.5 sides on both pillows to create a pillow-like shape. Sorry I don't have pictures of the process...I was too excited to stop and look for the camera.  I tore apart the stuffing to fluff it up and divided it in half.  Stuffing it into the pillow, I then sewed up the final seam and voila!


The pillows are ridiculously misforned and lumpy, but they'll work better than a rolled up sweatshirt and will hopefully reform as we sleep on them.


 When I got my sewing machine back in February, a surprise package was sent to me by my grandmother with lots of scraps of fabric and sewing essentials. One fabric reminded me of wood and camping so I decided to use it as a pillow case for the pillows.


It was the perfect amount for two pillow cases - which are a must when camping.  Gotta wash all that smokey, camping smell off when you get home!


So, that is how I turned an old, hoarded pillow into two awesome camping pillows.  I'll let you know how they work later this week - we're heading camping for a few days and are eager to try them out.


Oh, and stay tuned for the other things I made with the extra pillows!

Friday, May 27, 2011

Gallery Wall Remix

One of my favorite things about our new apartment is the gallery wall above our long two-person desk.  I love staring at it while sitting at the computer and reminiscing about the photographs or post cards or art we've hung up. Sometimes I found myself walking into the office just to look.

BEFORE

Lately, though, we've been accumulating some new pieces of art we wanted to add to the wall.  We initially hung everything thinking we'd just add onto it as we wanted, however most of our new pieces are larger and would look funky added on top or to the side of the gallery wall...they needed to be incorporated well. That last sentence may have been thought inside my head and not shared with my husband...which might explain the shock and surprise from John.

While John was in class I took everything off the wall and laid it all out on the floor....he was pretty taken back when he came home and couldn't walk into the office. As he realized he'd have to rehang everything, he looked pretty glum.


Our office looked like this for several weeks as we gained the energy to tackle the wall.


 We finally tackled the daunting task a few weeks ago and once again have a fabulous gallery wall (with the help of Layla-Butt, of course).


 Our goal was to bring some more color to the wall so the pictures were the focus instead of the mismatched frames.

AFTER

We did this by incorporating a few bold colors (like the robins egg, pink, and yellow) throughout the new art pieces.  Notice our LOVE painting is the same color as the frames that are in each section of the wall. We also placed the sunset in the lower center with a flower of the same color in the upper center to bring focus to those colors.


As we were collecting art and pictures to hang up, we got creative with the frames by making some of our own out of styrofoam (you can read about that here, here, and here) and cardboard.  Can you see the handmade frames?


 We are in love with our remixed gallery wall.  The large scale of the gallery adds more interest than before (which helps because our office is pretty bare) and the pops of color help balance out the large white desk we made and the large brown bookshelf that also resides in the room.

I'm so glad I got over my initial fear of creating a gallery wall - now we have a place for all of our fun art and pictures and nothing is hiding under the bed or couches due to no wall space.

Thursday, May 26, 2011

Exploring a City

With our fabulous house guest in town last week, we took the opportunity to really explore the new town we call home.  Isn't it fun when guests come and you have an excuse to do all the fun things you've wanted to do? So, when my mother came in to town a couple weeks ago, we had a list of places to explore, things to see, and food to try.

We visited a rose garden

We enjoyed several gardens

Hydrangeas are my favorite

Flowers


John and my mother

Old Salem - Home of the Moravians

We sewed the floral dress...details to come

Michael Jackson Wii...fun to play, more fun to watch
It was a fabulous visit with my mother and I can't wait until she comes again.  Unfortunately she left this week and life is going back to normal...the laundry is done, house is cleaned, and I'm slowly getting back into real life again.  Expect some new crafts and projects, some brainstorming and asking your opinions, and some major furniture renovation this summer! Can't wait!

Wednesday, May 25, 2011

Upcycling Project: Part 3

Yesterday I saw a woman throwing styrofoam into a dumpster and I instantly thought of my little experiment upcycling the material.  There is a lot of styrofoam left from the small cooler, but here is another project I completed.


First, you remember what the styrofoam looked like before, right? This little guy had too much potential to throw away as we were cleaning out of closets so I cut him up and am using him for some pretty awesome projects.  You can read part 1 and part 2 if you'd like to see the other outcomes of my experiment.

In part 1, you saw the cut out of the ampersand I had done by printing out a large ampersand on the computer and tracing it then cutting it out with a knife.  Here it is after being dipped in paper mache gunk (sans newspaper) and painted.


I chose to try paper mache without the newspaper for several reasons which include being tired of dealing with soggy newspaper and knowing that all the curves and holes would be difficult to cover in a flat fashion.  Instead, I slowly dipped the form in and out of the gunk several times to build up a strong layer and left it to dry.  It turned out much better than I expected - it's strong and evenly covered, however it's not as smooth as when I use newspaper.

I also made another H (the first H can be seen here) using both paint and mod podge.


The styrofoam is such a light material to work with and using the paper mache creates strength and durability.  I think these projects would be wonderful in a child's room, a dorm room (they would easily be hung with double sided tape) and they also look awesome on my gallery wall.

I still have styrofoam left...any suggestions on what to make next??

Tuesday, May 24, 2011

Upcycling Project: Part 2

Remember a long time ago when I shared that instead of throwing away a styrofoam cooler, I was trying to upcycle every inch of styrofoam from it? Well, let me show you some more projects I made from it!

As I've been sharing, John and I are trying to fill out our re-hung gallery wall (it will be revealed this week, I promise!) and I thought I'd see how well styrofoam worked as a homemade frame.


I love the way this frame turned out: it's rustic, imperfect, and beautiful in my mind.  I took some recycled wrapping paper and mod podged it onto the styrofoam circle, then cut out of cardstock a mat and framed a printed out picture of a bird.  I love it.


Here's another frame I made - this time I tried paper maching it to add strength and texture.  It only needed one layer of paper mache and it became much stronger.  Add some paint and voila!


Stay tuned for a few more styrofoam upcycling projects! I'm a little in love with this cheap, light-weight material that does not belong in a landfill and cost me absolutely nothing.


Check out the Into Our Linky Parties button to see where I'm linking up, like at Today's Creative Blog .

Thursday, May 19, 2011

Ikea is like Disney World for Grown Ups

My poor mother lives in New Mexico. Don't get me wrong - I love New Mexico.  Every day I miss the desert sunsets, the vast mountains, the colorful culture, the unique history.  Despite the amazing things that New Mexico has, it does not have one thing: Ikea. 

When my mother moved my littlest sister into college last year in Minnesota, she finally experienced what I like to call Disney World for Grown Ups.  She finally realized what she was missing by living in New Mexico (aside from seeing her favorite daughter regularly and whatnot).  Today she gets to experience her second visit to Ikea - yes, we are taking a trip to Charlotte to go shopping!

Now, usually John does not allow me to venture inside Ikea without supervision.  It's kind of like he knows me or something.  Luckily Unfortunately he is busy preparing for his graduate recital so Mom will be my co-conspirator supervisor.

A few things on my list of things to check out:

Plant Stand
I could definitely use a couple of these for my larger house plants that weight at least 15 tons.  I'd paint them to match the pot.
Basket for storage
Two of these to keep under my living room end tables would help with the wrangling of half completed projects, blankets, magazines, etc.
Dish towels
How fun and summery are these dish towels? I need them. I'm currently plotting if I couldn't cut them to make cloth napkins...
Hemnes Dresser
I've been drooling over this dresser for two years.  It won't make it's way into our cart, but there's nothing saying I can't spend a little quality time with it.
Super cheap inner cushions
These are definitely cheaper than any I find at Joannes!
Ribba Frames
What's an Ikea trip without some new Ribba frames?!
Solar lights
How cool are the new solar lights Ikea has? There are many to choose from...they'd light up any patio or balcony!

What are some things that are always on your Ikea shopping list?

Wednesday, May 18, 2011

Tree House Daydreams

All my life I've dreamed of having a tree house in my own backyard. Growing up in New Mexico, though, puts a little damper in those dreams because a tree house really can't be built in a tumbleweed. 

As an adult, I still find myself searching for tree houses in backyard during our walks and I've asked John to promise to build me our kids one someday.  Here are some plans I'm keeping tucked away for future use.

Spotted on Pinterest
If John built me something like this, it would be an adult only tree house.  Inside I'd keep a couch, books, and fairy lights.

Spotted on imgfave
Would we even need a house if we had this amazing tree house? I think not!

Spotted on Pinterest
The perfect childhood tree house.

Spotted on Tree House Company
I love this little tree house in the garden. So flowery, cozy, and colorful.

Spotted on Photobucket
This is a rustic little house - I'd trade the stairs for a ladder and tins connected by string for communicating.

Spotted on Apartment Therapy
 This is just the perfect house - in the trees, river view, windows galore. I'd move my family there in a heartbeat!

Spotted on Treehouse Workshop
 This is the ultimate kid's dream. Multi-levels and toms of ladders. There's even a lookout!

Spotted on Apartment Therapy

 The best way to outfit a treehouse is with a hammock and a book. Maybe some cookies thrown in for good measure.

Spotted on Treehouse Workshop
 I only wish I lived in this treehouse. Hold on, I have to show this to John and get his commitment he'll build it for me.

Tuesday, May 17, 2011

Sunflower Inspiration

My mother and I are spending the day exploring the beauty that is North Carolina. We'll be taking a walk through some pretty neighborhoods, visiting some gardens, and soaking in the wonderful flowers that fill every piece of space.


It tends to be a habit for me to fall in love with a location based on it's natural beauty. I snapped this picture to remind me of a cute little Connecticut town I visited a few summers ago.  Isn't it amazing how nature's color pallet is practically perfect? I can picture a sun room decorated in this color scheme.

Here are some other nature-inspired color schemes I found.

Spotted on Pinterest

Spotted on Design Work Life

Spotted on Design Seeds

Spotted on Design Work Life

Spotted on Pinterest

Isn't nature beautiful?

LinkWithin

Related Posts Plugin for WordPress, Blogger...